

BLOCK 3
Thank you for contributing to the SLMQG Community Outreach Quilt for QuiltCon!
Please make the (3) blocks as instructed below and return them at the October SLMQG meeting.
If you have any questions about the construction of your blocks or need help coordinating their return, please reach out to Brooke at:
CUTTING
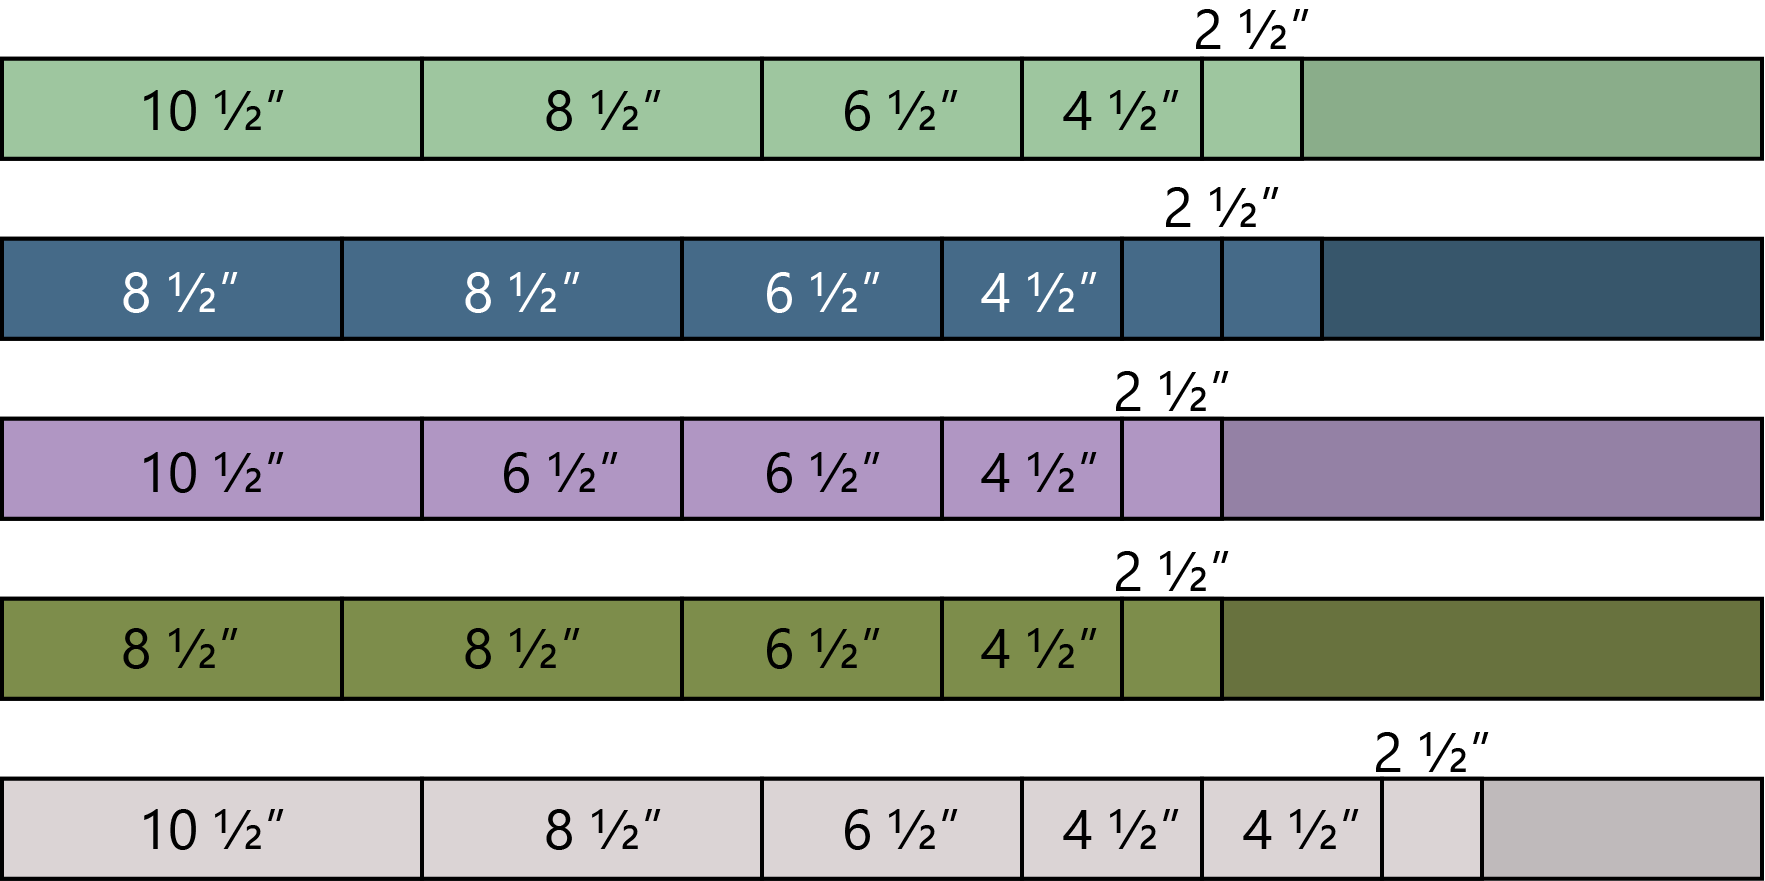
From the Light Green strip, cut:
(1) 2 ½" x 10 ½"
(1) 2 ½" x 8 ½"
(1) 2 ½" x 6 ½"
(1) 2 ½" x 4 ½"
(1) 2 ½" x 2 ½"
From the Blue strip, cut:
(2) 2 ½" x 8 ½"
(1) 2 ½" x 6 ½"
(1) 2 ½" x 4 ½"
(2) 2 ½" x 2 ½"
From the Purple strip, cut:
(1) 2 ½" x 10 ½"
(1) 2 ½" x 8 ½"
(1) 2 ½" x 6 ½"
(2) 2 ½" x 4 ½"
(1) 2 ½" x 2 ½"
From the Dark Green strip, cut:
(2) 2 ½" x 8 ½"
(1) 2 ½" x 6 ½"
(1) 2 ½" x 4 ½"
(1) 2 ½" x 2 ½"
From the Gray strip, cut:
(1) 2 ½" x 10 ½"
(1) 2 ½" x 8 ½"
(1) 2 ½" x 6 ½"
(2) 2 ½" x 4 ½"
(1) 2 ½" x 2 ½"
PIECING BLOCK 3A

Press seams as desired.
Sew the (2) 2 ½" x 2 ½" squares together as shown.
Sew the 2 ½" x 4 ½" rectangle shown to the top of the unit from step 1.
Sew the 2 ½" x 4 ½" rectangle shown to the right of the unit from step 2.
Sew the 2 ½" x 6 ½" rectangle shown to the top of the unit from step 3.
Sew the 2 ½" x 6 ½" rectangle shown to the right of the unit from step 4.
Sew the 2 ½" x 8 ½" rectangle shown to the top of the unit from step 5.
Sew the 2 ½" x 8 ½" rectangle shown to the right of the unit from step 6.
Sew the 2 ½" x 10 ½" rectangle shown to the top of the unit from step 7.
Block should measure 10 ½" x 10 ½".
PIECING BLOCK 3B

Press seams as desired.
Sew the (2) 2 ½" x 2 ½" squares together as shown.
Sew the 2 ½" x 4 ½" rectangle shown to the top of the unit from step 1.
Sew the 2 ½" x 4 ½" rectangle shown to the right of the unit from step 2.
Sew the 2 ½" x 6 ½" rectangle shown to the top of the unit from step 3.
Sew the 2 ½" x 6 ½" rectangle shown to the right of the unit from step 4.
Sew the 2 ½" x 8 ½" rectangle shown to the top of the unit from step 5.
Sew the 2 ½" x 8 ½" rectangle shown to the right of the unit from step 6.
Sew the 2 ½" x 10 ½" rectangle shown to the top of the unit from step 7.
Block should measure 10 ½" x 10 ½".
PIECING BLOCK 3C

Press seams as desired.
Sew the (2) 2 ½" x 2 ½" squares together as shown.
Sew the 2 ½" x 4 ½" rectangle shown to the top of the unit from step 1.
Sew the 2 ½" x 4 ½" rectangle shown to the right of the unit from step 2.
Sew the 2 ½" x 6 ½" rectangle shown to the top of the unit from step 3.
Sew the 2 ½" x 6 ½" rectangle shown to the right of the unit from step 4.
Sew the 2 ½" x 8 ½" rectangle shown to the top of the unit from step 5.
Sew the 2 ½" x 8 ½" rectangle shown to the right of the unit from step 6.
Sew the 2 ½" x 10 ½" rectangle shown to the top of the unit from step 7.
Block should measure 10 ½" x 10 ½".