

Mastering Circle Templates
Have you ever been sewing curves and wondered how to make your own circle templates for quilting? A quilter once asked me if there was a “quilting illuminati” keeping the secrets of circle templates, which made me realize: there’s not a lot of information out there on this! I don’t really believe in gate-keeping, and I love inspiring makers to take their creativity to the next level. So, why not share the love & magic of making your own circle templates? Let’s dive in and bring your curvy visions to life!
Contents: Theory | Math | Making the Compass | Full Circle Templates | Half Circle Templates | Quarter Circle Templates
Materials needed:
Thicker material (such as cereal box cardboard), for your compass
A stiletto, seam ripper, or something with a narrow, sharp point, to poke small holes into your compass
(2) pencils, for drawing with your compass
Sturdy paper (such as cardstock), for your templates
Ruler with a 45° line, to make tick marks along the curves of your templates
Scissors, to cut our your templates
Theory
It’s often easiest to start by wrapping your head around how the “fill” and “background” pieces of a sewn circle come together. One might think: If I want a 7” diameter circle, couldn’t I simply cut a 7” circle for my fill, and cut a 7” circle from my background, and sew them together? Well, that would be simple enough, but we need to take into account seam allowance.
Here’s where visualization is especially helpful. The picture on the left shows the backside of an inset circle, with the seams press outward. The seam represents the finished circle size, since that’s where the fill and background meet on the front side. You’ll notice that the fill piece extends ¼" beyond the seam, all the way around. So, in terms of radius, the fill circle is ¼" larger than our finished circle.
Now, let’s consider the background. the picture on the right shows the backside of the same inset circle, with the seams pressed inward. You’ll see how the background piece extends ¼" inside the seam, all the way around. So, in terms of radius, the circle cut from the background piece is ¼" smaller than our finished circle.
So, what this ultimately means is that, in terms of radius, our fill template is ½" larger than our background template; and, in terms of diameter, our fill template is a full 1" larger than our background template. Crazy, huh? If you’ve ever been sewing curves and felt a bit like you’re having to stretch your fill piece to get its edges to align with your background piece . . . it’s because you are! This is also why having accurate tick marks is helpful to know how much you should be stretching in order to properly allocate your fill curve across the background curve. But, more on that later ;)

Inset circle with the seam pressed outward.

Inset circle with the seam pressed inward.

Math
What the pictures above help demonstrate is that our finished circle dimensions - most notably, its radius - is our starting point for determining our fill & background templates. And, they aren’t the same! In fact, the fill template will be ¼" larger in radius than our desired finished circle size, and our background template (what we use to cut the circle out of our background fabric) will be ¼" smaller in radius than our desired finished circle size.
See how this maths out (that’s a phrase, right?) in the table below, using the example of a 7" diameter finished circle. Keep in mind that, while we often refer to circles by their diameter, it’s the radius that we focus on when making circle templates.

For a quick way to determine the radius of your fill & background circle templates, use the calculator below! Simply enter the radius (remember, half the diameter) of your desired finished circle, and you’ll get the radii for your fill & background templates.
Making the compass
Now let’s make our compass! Sure, you could dust off the ol’ compass from your school years, but I’ve personally found it more helpful to make your own. And, I’ve tried to make it easy with this free circle template compass download.
1. If using the template, you’ll want to either print it (be sure it prints at 100% scale! and use the 1" test square to double-check accurate sizing) on some very sturdy cardstock, or print it and glue/tape it to a piece of cardboard or other thicker material. Whatever material you use, you’ll want to make sure you are able to puncture a very small hole into it - e.g., cutting board plastic might not be the best for this use case, but cereal box cardboard works great (that’s what I’ve used).
Note that, depending on the size of your desired finished circle, you may not need the full length of the compass. Feel free to cut it down to about an inch beyond your desired finished circle radius. You’ll see that for my 7" diameter finished circle (i.e., 3½" radius), I’ve gone ahead and cut my compass just beyond the 4½" mark.
2. Use your stiletto, seam ripper, or other sharp point to poke a small hole at the 0" point where the perpendicular lines intersect toward the bottom of your compass. You want a hole just big enough to fit the lead of your pencil, and not so big that your pencil would wiggle around it in.
3. Now is where our calculations come in. We will now make similarly small holes where the vertical line intersects the tick marks at the radius measurements for our fill and background templates. For my example, I’d like my finished circle to have a 3½" radius. So, I will make a small hole at 3¾" (3½" + ¼" = 3¾") for my fill template, and a small hole at 3¼" (3½" - ¼" = 3¼") for my background template.
And that’s really it! Now you have your key tool for making your circle templates.

Making a hole at the 0" point of the compass
Full circle templates
1. First, you want to make sure that whatever piece of material you’re using for your templates is big enough. Do a quick measurement to ensure the full diameter of your circle will fit. Once you’re confident your piece is large enough for your circle, you may want to tape your template material down to the table to keep it from shifting while you draw your circle.
2. Place the 0" point of your compass in the center of where you will be drawing your fill template. Now, place your pencil in the 0” hole, and turn it a bit to make a small mark on your paper so that you’ll have a center point for the circle you’re about to draw.
3. Holding the pencil at 0” steady, place your other pencil in the further out hole on your compass (i.e., your fill template radius), and draw a full circle onto your template material.
Our template is almost complete, but it’s really useful to have markings around each of your circle templates to duplicate onto your fabric pieces so that you know where fill & background curves should match up when sewing them together - otherwise, curves could be sewn unevenly, making for a wonky final result.
4. To make these marks, use the center point and your ruler to draw a line that divides your circle in half. Now, draw a line through the same center point that is perpendicular to the line you just drew.
5. Use the 45° line on your ruler to draw another line that is - you guessed it! - 45° from one of the lines you’ve just drawn, ensuring it also intersects with the center point. Then, draw another line perpendicular to this line.
6. Cut out your circle, and you have a completed fill template!
Repeat the steps above to make your background template, only instead, place your second pencil in the further in hole on your compass. Once you have both templates, it’s helpful to place the background template on top of your fill template to make sure that all your markings align.

Drawing a line through the center of the circle template
Drawing a 45° line through the center of the circle template
Half circle templates + trimming
Thankfully, most of the steps for making half circle templates are the same as for full circle templates. The only difference is that, now we need to account for the straight edge seam allowance. With half circle templates, you have the option to add in some wiggle room for trimming your straight edge. I like to take advantage of this since sewing curves does sometimes cause us to stretch and warp our fabric a bit. And, who doesn’t want a less stressful sewing experience?
1. Make sure that your template material has a straight edge at least an inch longer than your desired finished circle diameter. Along this straight edge, use your ruler to measure and mark a line that is ½" inside this edge (if wanting room to trim) or ¼" inside this edge (if not wanting room to trim).
Here is where it will begin to feel like deja vu of full circle templates.
2. Use the bottom horizontal line at the 0" point of your compass to line up the 0" hole in the center of the line drawn. Now, place your pencil in the 0" hole, and turn it a bit to make a small mark on your paper so that you’ll have a center point for the half circle you’re about to draw.
3. Holding the pencil at 0" steady, place your other pencil in the further out hole on your compass (i.e., your fill template radius), and draw a half circle onto your template material, going all the way from edge of your template material to the other. Your circle will go past your straight line on both sides.

Marking inside the straight edge of the half circle template
Now let’s make those marks!
4. Use the center point and your ruler to draw a line that divides your circle in half and is perpendicular to the straight line drawn.
5. Use the 45° line on your ruler to draw another line that is 45° degrees from one of the lines you’ve just drawn, ensuring it also intersects with the center point. Then, draw another line perpendicular to this line.
6. Cut out your circle, and you have a completed half circle fill template!
Repeat the steps above to make your background template, only instead, place your second pencil in the further in hole on your compass. Important! Whether you decided to draw your initial line ½" or ¼" inside your template’s straight edge (step 1), use that same measurement when drawing this line for your corresponding background template. Note also that if you opted to add room for trimming, you will want to cut a background piece of fabric that is at least ½" wider & longer than your desired unfinished half circle unit.
Once you have both templates, it’s helpful to place the background template on top of your fill template to make sure that all your markings align.

Drawing a 45° line through the center of the half circle template

Drawing a 45° line through the center of the quarter circle template

Making a hole at the fill template radius point


Lining up the compass 0" point and pencil along the line drawn

Half circle template ready to be cut

Marking inside both straight edges of the quarter circle template

Lining up the compass 0" point and pencil with the two lines drawn

Making a hole at the background template radius point

Completed fill and background full circle templates

Completed half circle templates
Trimming sewn half circles
If you opted to add some extra wiggle room into your template for trimming, you may be wondering how to trim up your half circle unit once it’s sewn. Essentially, since you’ve added an extra ¼" to the straight edge, that’s the edge we’ll be concerned with trimming. Of course, I always advocate for cutting out background pieces a bit larger than their unfinished size (maybe a full inch longer & wider) to allow for trimming all the way around once unit is all sewn.
1. Orient your unit so that the straight edge of your circle runs along the right side - or left side, if you’re left-handed.
2. Place your ruler on top of your unit so that the seam at the widest horizontal part of your circle runs through the point on your ruler that is your finished radius + ¼".
Continuing with my 3½" radius finished circle example, I would make sure that the seam tangentially hits the line that is 3¾" to the left of my ruler edge.
3. Using your ruler, make sure that the widest vertical part of your circle measures your desired finished diameter along the line that is ¼" in from the edge of your ruler.
Continuing with my 3½" radius finished circle example, I would make sure that the height of my circle measures 7" along the line that is ¼" in from the left edge of my ruler.
4. Once your ruler is placed on your unit meeting the criteria from 2 & 3 above, trim along the edge of your ruler.

Quarter circle template ready to be cut

Drawing the full circle template

Ensuring markings line up between both templates

Half circle templates must take the seam along the straight edge (the center seam) into account

Drawing the half circle template
Quarter circle templates + trimming
Thankfully, most of the steps for making half circle templates are the same as for full & half circle templates. The only difference is that, now we need to account for both straight edge seam allowances. With quarter circle templates, you have the option to add in some wiggle room for trimming your two straight edges. I like to take advantage of this since sewing curves does sometimes cause us to stretch and warp our fabric a bit. And, who doesn’t want a less stressful sewing experience?
1. Make sure that your template material has two, perpendicular straight edges, each at least an inch longer than your desired finished circle radius. Along each of these straight edges, use your ruler to measure and mark a line that is ½" inside this edge (if wanting room to trim) or ¼" inside this edge (if not wanting room to trim).
2. Use the bottom horizontal line at the 0" point of your compass and the long vertical line to line up the 0" hole at the intersection of the two lines drawn. Now, place your pencil in the 0" hole, and turn it a bit to make a small mark on your paper so that you’ll have a center point for the half circle you’re about to draw.
3. Holding the pencil at 0" steady, place your other pencil in the further out hole on your compass (i.e., your fill template radius), and draw a quarter circle onto your template material, going all the way from edge of your template material to the other. Your circle will go past your straight line on both sides.

Drawing the quarter circle template
Now let’s make those marks! Thankfully, there’s only one line you need to draw for quarter circle templates since you’ve already drawn two.
4. Use the 45° line on your ruler to draw a line that is 45° degrees from one of the lines you drew along a straight edge, ensuring it also intersects with the center point.
6. Cut out your circle, and you have a completed quarter circle fill template!
Repeat the steps above to make your background template, only instead, place your second pencil in the further in hole on your compass. Important! Whether you decided to draw your initial line ½" or ¼" inside your template’s straight edges (step 1), use that same measurement when drawing these lines for your corresponding background template. Note also that if you opted to add room for trimming, you will want to cut a background piece of fabric that is at least ½" wider & longer than your desired unfinished quarter circle unit.
Once you have both templates, it’s helpful to place the background template on top of your fill template to make sure that all your markings align.
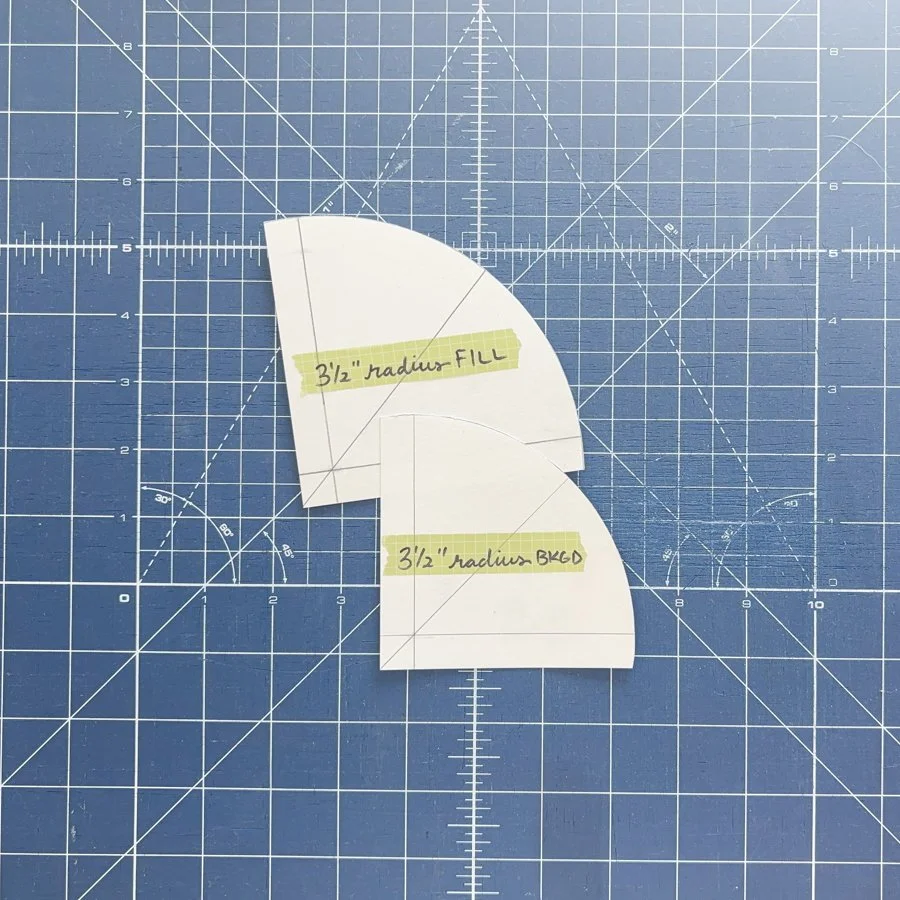
Completed quarter circle templates
Trimming sewn quarter circles
If you opted to add some extra wiggle room into your template for trimming, you may be wondering how to trim up your quarter circle unit once it’s sewn. Essentially, since you’ve added an extra ¼" to each of the straight edges, those are the edges we’ll be concerned with trimming. Of course, I always advocate for cutting out background pieces a bit larger than their unfinished size (maybe ½" longer & wider) to allow for trimming all the way around once the unit is all sewn.
1. Orient your unit so that the straight edges of your circle run along the right side - or left side, if you’re left-handed - and along the top.
2. Place your ruler on top of your unit so that the seam at the top of your unit runs through the point on your ruler that is [your finished radius + ¼"] from the right (or left, if cutting lefty) edge of your ruler.
Continuing with my 3½" radius finished circle example, I would make sure that the seam hits the line that is 3¾" to the left of my ruler edge.
3. Using your ruler, make sure that the seam at the right (or left) of your unit runs through the point on your ruler that is [your finished radius + ¼"] from the top edge of your ruler.
Continuing with my 3½" radius finished circle example, I would make sure that the seam hits the line that is 3¾" below the top edge of my ruler.
4. Once your ruler is placed on your unit meeting the criteria from 2 & 3 above, trim along the side and top edges of your ruler.

Ensuring markings line up between both templates


Quarter circle templates must take the seams along both perpendicular, straight edges into account

Ensuring markings line up between both templates

Making circle templates isn’t so hard, right? And if you never thought making your own curved templates was possible, I hope this overview & tutorial has inspired you to sew some circles of your own design - the sky’s the limit, truly!
Interested in some patterns using curved piecing? Check out Impermanence & Currents, both great for makers new to sewing circles & curves.

